|
One Hard Drive - One CD-ROM Drive
- The Primary IDE cable will plug into the hard drive which will boot first.
- This is the C: drive. This hard drive will plug into the very end connector of the ribbon cable. This "boot" hard drive will have its jumpers set as "Master." These jumper settings can be found printed directly on the hard drive case.
- The Secondary IDE cable will plug into the CD-ROM.
- This Secondary IDE device, since by itself, will be jumpered as "Master" as well. The reason for this setup is that an IDE controller cannot multi-task, meaning transferring data from or to two devices at the same time. Therefore, by putting each device on its own controller, it will improve data transfer e.g. when installing from the CD-ROM to the hard drive because data can be transferred from the CD-ROM and to the hard drive at the same time since they each have their own controller. If they were on the same controller, it could do only one thing at a time and would have to wait until one transfer is complete, then switch and do the other one. This setup is also good when you have a CD-R (CD burner) because this arrangement will help to ensure that the data from the hard drive to be burned onto CD is being fed continuously to the burner. If the data stream gets interrupted, it could cause a buffer underrun, meaning you just produced a coaster.
Two Hard Drives - One CD-ROM Drive
- The Primary IDE cable will plug into the hard drive which will boot first.
- This is the C: drive. This hard drive will plug into the very end connector of the ribbon cable. This "boot" hard drive will have its jumpers set as "Master." These jumper settings can be found printed directly on the hard drive case.
- The Secondary IDE cable will plug into the second hard drive, and CD-ROM drive.
- In this scenario, you 'll plug the cable into the second hard drive, which should be jumpered to "Master", and the CD-ROM drive, jumpered as "Slave." You can benefit from this setup after installing Windows by putting the Windows swap file onto this second hard drive, which will result in a small performance gain. For more information about the Windows swap file, check out our article on Managing the Swap File.
Four IDE Devices
- Since each IDE channel can hold only two IDE devices and most motherboards come with two IDE controllers, this is the maximum amount of IDE devices you can have in a regular setup.
- With four IDE devices, the only choice you have is what device to connect to what channel. Follow the guidelines given above about putting the CD-ROM (or CD-R or DVD-ROM) on the secondary controller, and, if applicable, a second hard drive on the secondary IDE controller. Important: Some hard drives have different jumper settings, depending whether there is a second device present on the same channel or not. E.g. one IDE drive by itself on the Primary IDE channel would be jumpered as "Master only" or "Master without Slave present." But if there is a second device on the same channel, you might need to jumper it as "Master with Slave present." Consult the drive's manufacturer's web site for the necessary settings if they are not clearly printed on a sticker or marked otherwise on the drive.
Note: Some newer motherboards offer now more than two IDE controllers, e.g. two additional DMA66 controllers, which lets you add more than 4 IDE devices. Or, if you're using SCSI in your system, then you obviously don't have to worry about above mentioned restrictions either.
Let There Be Power
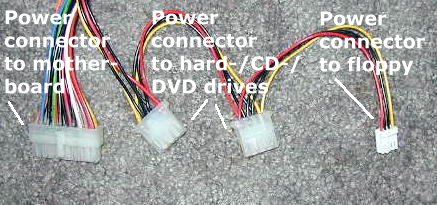
 Of course you need power to run this whole machinery - no juice, no fun. Look at that bundle of cables and connectors from the power supply. It has different shaped plugs. Of course you need power to run this whole machinery - no juice, no fun. Look at that bundle of cables and connectors from the power supply. It has different shaped plugs.
The biggest one, a massive 20-pin connector, supplies power to the motherboard. Consult the motherboard manual on how to connect this one, but it should be pretty obvious as there is only one socket that can accomodate this plug, and it is shaped so that it can only fit one way.
The medium sized connectors are for your hard drives and CD drives. They also fit only one way and the socket for this plug is very obvious on the back of those devices.
The smallest connector, of which there might be only one or two, are for floppy drives.
Let There Be Light
All that remains now is to install your video adapter card and any other cards you intend to use. The trick to these is to wiggle and rock them gently and firmly into place. Line up the metal tab with the slot in the back of the case and just start the card into the socket. Make sure you have everything lined up. Look it over carefully. Then, once you are comfortable that the card is ready to be seated you can begin applying pressure while you wiggle the card from side to side and rock it back and forth. Seat the card down into its connector completely and screw in the locating screw that attaches it to the back of the case, just above the slot. Repeat this process with each of the cards you intend to install.
Let There Be Caution
You've come this far. At this point you will probably be excited about what you've accomplished and anxious to get that puppy fired up. Not so fast there, chum. Stop and double-check yourself. Look very carefully at everything you've done. Is each connector and card fully seated and plugged in correctly? Visually inspect your handiwork. Take the opportunity to feel good about what you've accomplished so far. Once you feel confident that all is well you can begin to set it up for its first boot.
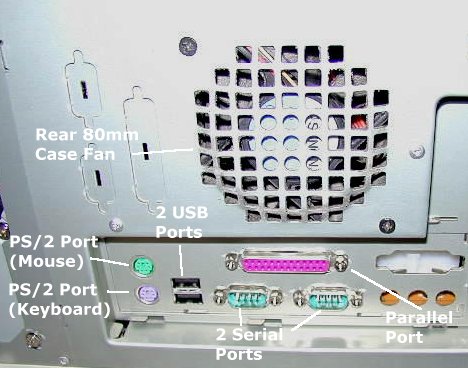
 By now you're so familiar with all the parts and their purpose that you need little guidance. Leave the covers off of the case for now; you may need to go back in to check some of your work or make adjustments if you didn't get one of the jumper settings right the first time. Plug the monitor into the video adapter and then the keyboard, mouse, and other peripherals into the correct ports. Of course, you'll need a bootable floppy disk for your favorite operating system. Plug it into the A: drive and hit the power switch. At this point, don't forget to go into the BIOS setup and make any necessary adjustments, if applicable. By now you're so familiar with all the parts and their purpose that you need little guidance. Leave the covers off of the case for now; you may need to go back in to check some of your work or make adjustments if you didn't get one of the jumper settings right the first time. Plug the monitor into the video adapter and then the keyboard, mouse, and other peripherals into the correct ports. Of course, you'll need a bootable floppy disk for your favorite operating system. Plug it into the A: drive and hit the power switch. At this point, don't forget to go into the BIOS setup and make any necessary adjustments, if applicable.
You've just built your own computer from scratch. Now that wasn't so difficult, was it? Now all you need to do is install the operating system. For some help with that, check out our article on Clean-installing Windows.
If you ran into a snag during assembling your PC, don't despair - come to the PC Q&A forum and let us know where you're stuck. We'll help you over the finish
line.
Page 1: Building your PC
Page 2: Starting to build your PC - let
the party begin
Page 3: Assembly - The Motherboard
Page
4: Installing Drives
- PokPok - |
|