| Friendly Expert Computer Help - In Plain English | |||

|
|
|
|
|
|
|
|
|
| PC911 > How-To > Miscellaneous > Once More Into The Fire |
If you are like me, then 90% of your computer is probably betaware. More often than not (MUCH more often in my case), your system ends up crashing. What you need is a quick way to restore everything. Here, your CDR drive can also help you. With a CDR drive, you can create a bootable CD that can restore everything for you, much like the ones that come with Dell, IBM or any number of PC retailers. If you've used one of those disks, you'll know that once you put the CD into the CD-ROM drive, the system will automatically boot off the CD-ROM, much like how it boots off a floppy disk. Once booting is complete, the system will automatically start to restore your files.
How is this accomplished? There are three basic parts to a CD of this kind:
- A bootable image on the CD, so that a basic operating system can be loaded from the CD.
- A program that will automate the restore process on the CD.
- A single data file, or a set of data files, which contains your system data.
Besides a bootable image, you will also need a program that will automate the restore process. One of the most popular programs is Norton's GHOST. This program will both create the image file and restore from it. It is ideal for large scale system replication. Look on PC911 for a tutorial on using ghost.
Write The Bootable Image
First, prepare a Win98 boot disk, or any boot disk with CD-ROM support. Then follow these instructions:
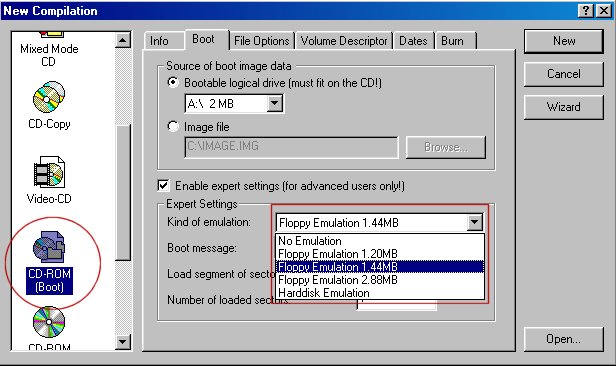
|
- In Nero Burning ROM, create a New CD Layout (File - New)
- Now insert your boot disk into Drive A.
- Choose Bootable CD from the left hand side column of the File - New dialogue box.
- Now click on New and you are ready to add the rest of your files to the CD.
A Brief on Multiple Configurations
As of DOS 6.0, the Autoexec.bat and Config.sys files supported multiple boot configurations, allow the user to custom load a set of drivers for a particular task. This is the same menu you see with Windows 98's boot disk. In this section, I will quickly cover the basics behind reading and understanding multiconfig config.sys/autoexec.bat files. Since you'll most likely be dealing with Win98's boot disk, let's take its autoexec.bat and config.sys files as our example.
Autoexec.bat file
@ECHO OFF
set EXPAND=YES
SET DIRCMD=/O:N
set LglDrv=27 * 26 Z 25 Y 24 X 23 W 22 V 21 U 20 T 19 S 18 R 17 Q 16 P 15
set LglDrv=%LglDrv% O 14 N 13 M 12 L 11 K 10 J 9 I 8 H 7 G 6 F 5 E 4 D 3 C
cls
call setramd.bat %LglDrv%
set temp=c:\
set tmp=c:\
path=%RAMD%:\;a:\;%CD-ROM%:\
copy command.com %RAMD%:\ > NUL
set comspec=%RAMD%:\command.com
copy extract.exe %RAMD%:\ > NUL
copy readme.txt %RAMD%:\ > NUL
:ERROR
IF EXIST ebd.cab GOTO EXT
echo Please insert Windows 98 Startup Disk 2
echo.
pause
GOTO ERROR
:EXT
%RAMD%:\extract /y /e /l %RAMD%: ebd.cab > NUL
echo The diagnostic tools were successfully loaded to drive %RAMD%.
echo.
IF "%config%"=="NOCD" GOTO QUIT
IF "%config%"=="HELP" GOTO HELP
LH %ramd%:\MSCDEX.EXE /D:mscd001 /L:%CD-ROM%
echo.
GOTO QUIT
:HELP
cls
call help.bat
echo Your computer will now restart and the startup menu will appear.
echo.
echo.
echo.
echo.
echo.
echo.
echo.
echo.
echo.
echo.
restart.com
GOTO QUIT
:QUIT
echo To get help, type HELP and press ENTER.
echo.
rem clean up environment variables
set CD-ROM=
set LglDrv=
This may seem scary at first glance, but let's take it one part at a time, and you will see that it is quite simple:
@ECHO OFF
set EXPAND=YES
SET DIRCMD=/O:N
set LglDrv=27 * 26 Z 25 Y 24 X 23 W 22 V 21 U 20 T 19 S 18 R 17 Q 16 P 15
set LglDrv=%LglDrv% O 14 N 13 M 12 L 11 K 10 J 9 I 8 H 7 G 6 F 5 E 4 D 3 C
cls
call setramd.bat %LglDrv%
set temp=c:\
set tmp=c:\
path=%RAMD%:\;a:\;%CD-ROM%:\
copy command.com %RAMD%:\ > NUL
set comspec=%RAMD%:\command.com
copy extract.exe %RAMD%:\ > NUL
copy readme.txt %RAMD%:\ > NUL
In general, what this part of the batch file does (script file) is that it assigns values to a bunch of variables so that the rest of the program can use it. Those are the set commands. It then copies some of the vital files, such as extract.exe and command.com to a temporary part of your memory known as a RAM Drive. And that's all this part does. Simple.
In the next part:
:ERROR
IF EXIST ebd.cab GOTO EXT
echo Please insert Windows 98 Startup Disk 2
echo.
pause
GOTO ERROR
In the Error section of the autoexec.bat file, the system checks to see if a file called ebd.cab is present. This is the file that contains most of the vital DOS commands on your boot disk, such as format, sys and fdisk. If the file is found, the batch file jumps out of the error checking loop and proceeds. If not, it loops back to the start of the ERROR and continues looping until the ebd.cab file is found, or until the user forcefully terminates the batch file.
If ebd.cab is found, the batch program jumps to the EXT section of the file:
:EXT
%RAMD%:\extract /y /e /l %RAMD%: ebd.cab > NUL
echo The diagnostic tools were successfully loaded to drive %RAMD%.
echo.
IF "%config%"=="NOCD" GOTO QUIT
IF "%config%"=="HELP" GOTO HELP
LH %ramd%:\MSCDEX.EXE /D:mscd001 /L:%CD-ROM%
echo.
GOTO QUIT
Here is where the vital DOS commands from the ebd.cab is extracted to your RAM drive by using the extract command, which was copied to the RAM drive at the very beginning of the program. After the files are copied, the system then checks to see if the user chose to have CD-ROM support via the config.sys menu. If so, CD ROM drivers are loaded. If not, the program quits.
To add your own commands so that they are executed regardless of which configuration is chosen, you must put those commands before the line that's marked red. To ensure that one of your commands is only executed if the user chooses to use the CD, put it in between the two blue lines.
Now, let's look at your config.sys file:
[menu]
menuitem=CD, Start computer with CD-ROM support.
menuitem=NOCD, Start computer without CD-ROM support.
menuitem=HELP, View the Help file.
menudefault=CD,30
menucolor=7,0
[CD]
device=himem.sys /testmem:off
device=oakcdrom.sys /D:mscd001
device=btdosm.sys
device=flashpt.sys
device=btcdrom.sys /D:mscd001
device=aspi2dos.sys
device=aspi8dos.sys
device=aspi4dos.sys
device=aspi8u2.sys
device=aspicd.sys /D:mscd001
[NOCD]
device=himem.sys /testmem:off
[HELP]
device=himem.sys /testmem:off
[COMMON]
files=10
buffers=10
dos=high,umb
stacks=9,256
devicehigh=ramdrive.sys /E 2048
lastdrive=z
This file is much more readable. In the [menu] section, three choices for the menus are defined. Each menu item is associated with a specific section of the file. For example, if Start computer with CD-ROM support is selected, the system will proceed to load stuff in the [CD] section of the file, after it loads the [COMMON] section. Basically, anything under the COMMON section is loaded regardless of which configuration is chosen. Everything else is pretty obvious if you've ever dabbed in config.sys files.
With the understanding of these basic concepts behind multiboot startup files, you should be able to modify the Win98 boot disk to suite the needs of your bootable CD-ROM. Be sure to make sure that everything works before you write it to the CD.
| Back To Top Of Page | ||
|
[PC911 Home]
[News]
[How-To's]
[Tips & Tweaks]
[Reviews]
[Freeware]
[Best Prices]
[Links] [Search] [About PC911] [Link To PC911] [Support PC911] [Legalese] ©Copyright 1998-2022 PC911 Webmaster |
||