|
Getting all of the wires lined up and inserted correctly can be a little tricky, so take your time. This gets easier as you get the feel of it.
If everything went well, it should look like this:
Right:
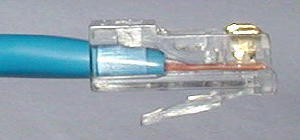

See how the end of the insulation sits snug inside the RJ-45, and how the wires go all the way to the end?
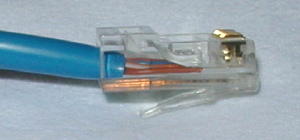
Below are two examples how it should NOT look. In the example on the left the wires were left too long, which leaves wires unprotected between the RJ-45 and the insulation. In the example on the right, the wires were cut too short and now don't reach far enough to make contact.
Wrong!

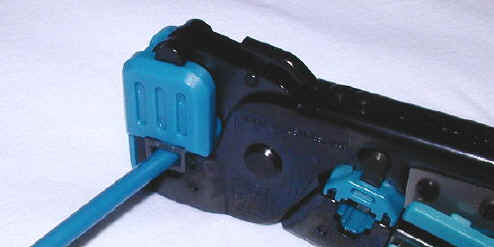
Double-check one last time that the wires are aligned correctly and all the way in. Then insert the RJ-45 connector into the appropriate opening of the crimping tool. Give the handle a nice, tight squeeze without crushing the RJ-45. If you have purchased a pair of ratchet type crimpers you will know that you are done when they release. If you bought a cheap-o pair, check to make sure that all of the little metal contacts are even and at the same height below the plastic of the plug.
Now repeat this entire procedure to put an RJ-45 plug on the other end of the cable. Use the exact same wiring scheme as on the first end, which will make it a straight-through cable.
Note: If you decided to spend a couple extra bucks on the strain relief sleeves, be sure to put them on and facing the correct direction before you crimp the second end.
Page 1: Making your own
network cable
Page 2: What type of cable do you want to
make?
Page 3: Attaching the plug / RJ45
connector
(this page)
Page 4: Making a crossover cable
|