|
1 - Identify your motherboard and BIOS
The first step is to find out what motherboard and BIOS you have. We have a comprehensive article on how to identify your motherboard in our how-to section, you can find the article here: http://www.pcnineoneone.com/howto/moboid1.html. It also covers information on identifying your BIOS.
While there are a lot of motherboard manufacturers, there are two main BIOS companies out there: AMI (American Megatrends) and Award. Most motherboards use one of these two BIOS types. Both BIOS types display the BIOS identifier number on the main BIOS screen you see when you start the computer.
Tip: Push the Pause/Break key on your keyboard after the BIOS screen appears. It will pause the BIOS program and give you time to look over the screen to identify and document the BIOS number. Press Enter to continue.
Tip: There is a program available that is able to identify the BIOS from within Windows. It is called BIOS Agent and can be downloaded here: http://www.esupport.com/bioswiz/
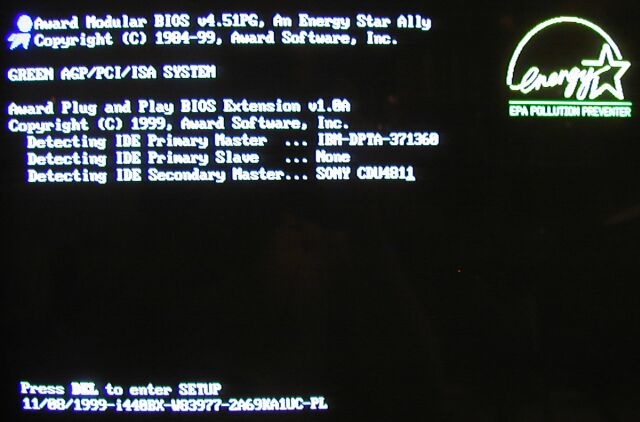
In the example used for this article the BIOS is an Award BIOS. The identifier string is located at the bottom and looks like this: 11/08/1999-i440BX-W83977-2A69KA1UC-PL
This gives us the following information:
- 11/08/1999 is the date of the BIOS
- i440BX indicates that the motherboard is using the Intel 440BX chipset
- 2A69K also identifies the chipset as an Intel 440BX/ZX
- A1 indicates that the motherboard was made by Abit
- UC identifies the board as the model BE-6
- PL is the BIOS version
Now that we know the motherboard model and the BIOS version, the next step is a visit to the Abit website to check for a later BIOS version.
2 - Download the updated BIOS file and flash utility
Sure enough, there have been three new BIOS releases for this particular motherboard. According to the release notes they fixed three bugs, improved IRQ assignment, and offered support for faster processors. The most recent BIOS version is TH.
Note: You do not have to flash every single update, only the most recent one. It contains all previous updates.
Download the BIOS file to the hard drive. It is a self-extracting executable. After double-clicking it extracts the actual BIOS BIN file, in our case called BE6_TH.BIN, which contains the new BIOS software.
In order to perform the flash, we also need the Award flash utility. This program performs the task of erasing the old BIOS from the chip and uploading the new BIOS. We download this file called awdflash.exe to the hard drive as well.
3 - Prepare a clean DOS boot disk
A BIOS flash needs to be performed from a true DOS environment. The only way to get a clean plain DOS environment is by booting from a DOS boot floppy. You can download a DrDOS boot disk from http://www.bootdisk.com/. Execute the downloaded file to create a DOS boot floppy. Please use a good quality new floppy disk to minimize the risk of the BIOS flash failing due to corrupted files on the floppy.
Note: Yes, there are now programs that supposedly allow flashing certain BIOS's from Windows. Yes, there are ways to perform the flash from the hard drive instead of floppy disk in certain situations. However, these situations do not apply to every single computer. The method of booting and flashing from a floppy disk described here is by far the most common one.
Once the DOS boot disk has been created, copy both the BIN file as well as the flash utility to the floppy disk.
Be sure to reboot with the disk at least once before the flash process to confirm the disk works properly.
4 - RTFM - Read the freakin' manual!
Before you go any further, make sure you read the manual, specifically the instructions for BIOS flashing. It will explain how to use the flash utility and all the command line switches it uses. It is important that you understand what command to run to perform a proper BIOS flash.
In this example I decided to use the following command after reading the manual:
AWDFLASH BE6_TH.BIN /PY BE6_PL.BIN /SY /CD /CP /CC
Here's what this command does in this case:
- Awdflash is the name of the utility
- BE6_TH.BIN is the name of the new BIOS BIN file to be uploaded
- /PY is the command to program the flash memory
- BE6_PL.BIN is the name of the file as which the old BIOS will be backed up to the floppy disk
- /SY is the command to back up the old BIOS to the floppy
- /CD is the command to clear the DMI data after programming
- /CP is the command to clear the Plug'n'Play data after programming
- /CC is the command to clear the CMOS data after programming
The reason I am clearing all the existing data is because I want to start with a nice clean slate and verify or configure all BIOS settings after the flash.
Again, read the instructions carefully, make sure you understand them, prepare the command line you will use for the flash process, and write it down on a piece of paper.
5 - Last preparations
As mentioned before, the most common reasons for a failed BIOS flash are uploading the wrong file and having power dips or failures during the flash causing the computer to reboot during the procedure, wrecking the BIOS for good.
You protect yourself against the incorrect BIN file by carefully double-checking your work, making sure you correctly identified your motherboard and BIOS, and downloaded the appropriate BIOS update file.
To make sure that a power failure doesn't ruin your BIOS, plug your computer into a UPS (Uninterruptable Power Supply) that will provide battery power in case of power failure. More on UPS in this article: http://www.pcnineoneone.com/howto/ups1.html
Reboot your machine and press the appropriate key to enter your BIOS. Typical keys to access the BIOS are (by manufacturer):
AMI - F1, Del, Ctrl-S
AST - Ctrl-Alt-Esc
Award - F1, F2, Del, Ctrl-Alt-Enter
Compaq - F10
Phoenix - F2, Ctrl-Alt-Esc, Ctrl-Alt-R, Ctrl-Alt-Ins, Ctrl-Alt-Q, Ctrl-Alt-F1, Ctrl-Alt-+, Ctrl-Alt--
IBM - PS1 Ctrl-Alt-I
Now go through every single page and carefully document the current BIOS settings. This step is very important because after the BIOS flash some or all of the settings will be gone and you will have to reconfigure it manually.
Tip: If you have a digital camera, use it to take pictures of each BIOS screen. It's a lot quicker than writing down each setting by hand.
While you're in here, take a look at the boot sequence and make sure the floppy disk drive is set as the first boot device.
Page 1:
Basics of CMOS/BIOS flashing
This page 2: BIOS flashing utilities (and precautions)
Page 3: Performing the CMOS
flash
|