| Friendly Expert Computer Help - In Plain English | |||

|
|
|
|
|
|
|
|
|
| PC911 > How-To > Miscellaneous > Once More Into The Fire |
As I said above, cue sheets provide a new and powerful way to control how data is written. With the help of a cue sheet, you can:
- Control the amount of silence between tracks
- Create sub tracks. If a track has a sub track, then when you press the next track button on the CD, instead of skipping to the next track, the CD will start playing at the sub track within the current track. For example, let's say that a track was 6 minutes long. Unfortunately, the first 2 minutes of the song is a boring prelude, and every time you go to the song, you send 10 second forward past the first two minutes. By creating a sub track at 2 minutes into the song, all you have to do is press the next track button once, and the CD player will automatically start playing at 2 minutes.
- Create hidden tracks. Hidden tracks are tracks that normally wouldn't be played in a CD player unless you knew where it was, and specifically fast forward to that location.
- Create enhanced CDs that contain both audio and data.
Cue Sheet Syntax
Like most scripting languages, all you need to create a cue sheet is a text editor. Find your favorite text editor and open a new file. Before we start writing the cue sheets, we need to understand its language and syntax. The cue sheet language is quite simple, consisting of a small list of keywords. Of that list, we need only need an even smaller sub set of those keywords for our purposes:
- FILE
- TRACK
- INDEX
- PREGAP
- POSTGAP
Standard Audio CD, with a WAV file for each track:
FILE C:\TRACK1.WAV WAVE
TRACK 01 AUDIO
INDEX 01 00:00:00
FILE C:\TRACK2.WAV WAVE
TRACK 02 AUDIO
INDEX 01 00:00:00
FILE C:\TRACK3.WAV WAVE
TRACK 03 AUDIO
INDEX 01 00:00:00
etc.
There are a few things to note from the above example:
- The FILE keyword appears before all other keywords listed (in fact, it must appear before all other keywords except the CATALOG keyword). You specify a file first, then a track, then an index. The syntax for the file command is fairly obvious. FILE <filename> <format>. The <format> parameter can take on the following values:
- WAVE - WAV Audio
- AIFF - Another audio format
- MOTOROLA - A type of binary data
- BINARY - the stuff we see. TXT files, documents, etc.
- Obviously we'll be dealing with WAVE And BINARY Format most often.
- Once a file is specified, a TRACK can then be specified. There must be at least one track per file. The TRACK command syntax is as follows: TRACK <number> <data mode>. The <data mode> can take on several values. But in our case, we'll be dealing with only two of them:
- AUDIO
- MODE1/2048 - used to write normal computer data.
- After a TRACK is specified, you can then specify one or more indices. The index number must be 00 or greater. To burn a normal Audio CD, your first index should be 01. After the index number, you must specify the starting time for the track. In my case, it was 00:00:00, the beginning. I could have very well specified 2:14:00, which would start the beginning of track one 2 minutes and 14 seconds into the WAV file.
- Finally, note that there is no pause area between each of the tracks. In other words, if the CD were burned correctly (and assuming each WAV doesn't have a silence in the beginning), one track would flow seamlessly into the next.
In the above example we wrote the cue sheet for a standard Audio CD. Nothing too exciting. Now lets create another standard audio CD. But this time, we need a one minute gap between each track. Here is how the CD would change. Changes are bolded:
FILE C:\TRACK1.WAV WAVE
TRACK 01 AUDIO
INDEX 01 00:00:00
FILE C:\TRACK2.WAV WAVE
TRACK 02 AUDIO
PREGAP 01:00:00
INDEX 01 00:00:00
FILE C:\TRACK3.WAV WAVE
TRACK 03 AUDIO
PREGAP 01:00:00
INDEX 01 00:00:00
etc.
The points to get out of the above example are:
- PREGAP command inserts digital silence into a track. In our case, 1 minute of it. It is generated by the program.
- The PREGAP command must come after a track command, but before all INDEX commands.
In the previous example you learned how to generate a pregap with with the PREGAP command. There is another way to generate gaps, and that is through the index command. In all of our previous examples we always index our tracks starting at 01. But in fact the index can start at 00. The time between index 00 and 01 is also considered as pregap time. Most CD players will skip index 00 and go straight to index 01. So to create a two second pregap with the index command, here is how the cue sheet would look:
FILE C:\TRACK1.WAV WAVE
TRACK 01 AUDIO
INDEX 00 00:00:00
INDEX 01 00:02:00
FILE C:\TRACK2.WAV WAVE
TRACK 02 AUDIO
INDEX 00 00:00:00
INDEX 01 00:02:00
FILE C:\TRACK3.WAV WAVE
TRACK 03 AUDIO
PREGAP 00:30:00
INDEX 00 00:00:00
INDEX 01 00:02:00
etc.
Points to get:
- Notice that INDEX 01 is now shifted to 2 seconds, and INDEX 00 starts at 00:00:00 of the WAV file.
- There is a subtle difference between using PREGAP and INDEX 00. When you use PREGAP, the data generated is always digital silence. When INDEX 00 is used, whatever data was stored in the first two seconds of the audio file is written into the pregap, even if it was normal audio.
- PREGAP And INDEX 00 can be used together, as in track 3. The PREGAP generated 30 seconds of digital silence, followed by two seconds of "stuff" from the WAV file.
So why bother with INDEX 00? PREGAP seems easier. It is. But there is a neat trick you can pull with using INDEX 00, and that is to create hidden tracks. Remember that most CD players will skip the PREGAP And go straight to INDEX 01. So what you can do is to store a segment of audio in between INDEX 00 and 01. That data would never be read by normal CD Players. But on some CD players (such as mine) if you press the rewind button, it will actually rewind into negative time. That negative time is the "stuff" in the pregap. Most people don't notice it because most pregaps are only 2 seconds long. The rewind is too fast. But if the pregap were a lengthy 2 minutes, then you will see the time go negative. If you release the rewind button, the CD player will actually play the stuff in the pregap index. And there is your hidden track. Unless some one knew that there is data before a track, they'd never hear it. The CD player would just skip over index 00. Note that the hidden track technique can not only be applied to hiding audio data, it can also be used to create an enhanced CD that contains both data and audio by hiding the data in the pregap. Unfortunately, we cannot do that with CDRWIN. But it is a possibility with other programs.
Let's continue with our discussion of using indices. We can create many indices under a single track, up to 99 indices. The purpose is to create sub tracks within tracks. When you press the next track button on the CD player, the CD player actually jumps to the next thing in the table of contents. In most cases, that would be index 01 of the next track (Index 00 is actually not stored in the table of contents). But if there happened to be more than one index to a track, the CD player would jump not to the next track, but to the index subindex within the current track. So let's look at the cue file:
FILE C:\TRACK1.WAV WAVE
TRACK 01 AUDIO
INDEX 00 00:00:00
INDEX 01 00:02:00
INDEX 02 03:00:00
INDEX 03 05:30:00
FILE C:\TRACK2.WAV WAVE
TRACK 02 AUDIO
INDEX 00 00:00:00
INDEX 01 00:02:00
INDEX 02 04:00:25
FILE C:\TRACK3.WAV WAVE
TRACK 03 AUDIO
INDEX 00 00:00:00
INDEX 01 00:02:00
etc.
Since no new syntax is introduced, I will forgo the point-by-point summaries. Notice that track one now has two additional sub indices. And track 2 has one more sub index. When you press the next track button in track one, it will first jump a point 3 minutes into the track. Press next track again, and it will jump to 5 minutes and 30 seconds into the track. On track 2, press the next track button and it will jump to a point 4 minutes and 1/3 of a second into the track (remember 75 frames per second).
A friend comes to you and says that he wants to create a CD that whose tracks flow together from song to song with no stops in between. He tells you that cutting the big 650 meg WAV file into separate tracks, and making sure they all flow together is too difficult. You said you could solve his problem in six letters - CDRWIN. You proceed to tell him that CDRWIN can write a single WAV file into multiple tracks like so:
FILE C:\FULLCD.WAV WAVE
TRACK 01 AUDIO
INDEX 01 00:00:00
TRACK 02 AUDIO
INDEX 01 04:31:00
TRACK 03 AUDIO
INDEX 01 08:32:00
TRACK 04 AUDIO
INDEX 01 10:58:00
etc.
Absolutely astounded, your friend gives you a million dollars (or at least a big thank you).
Lastly, let's see how we can write MP3 files into standard audio tracks. There is really not much to it. You first need to decode the MP3 file into a WAV. The most popular way is to use Winamp's built in disc writer functionality:
|
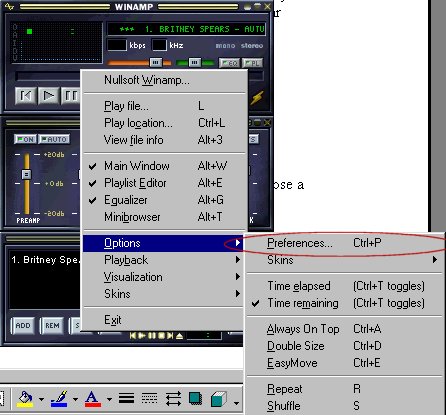
- First, open Winamp.
- While with Winamp's main window in focus, press Ctrl + P to bring up the properties menu (right click would also work).
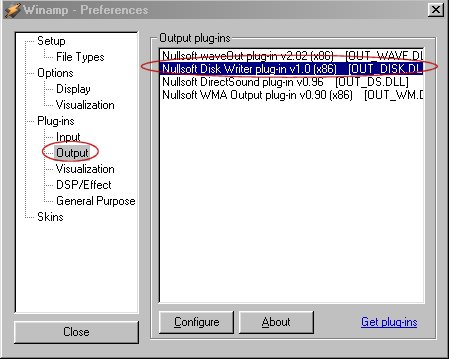
- From there, choose Output.
- From output, choose the disc writer plug-in.
- The plug-in will now ask for a directory in which to store the output files. Choose a directory and click on Ok.
- Back out of the properties dialog box.
- Load your MP3s and have them decoded into WAV.
|
After the MP3s are decoded to WAV, you can now record it onto a CD following the instructions above.
| Back To Top Of Page | ||
|
[PC911 Home]
[News]
[How-To's]
[Tips & Tweaks]
[Reviews]
[Freeware]
[Best Prices]
[Links] [Search] [About PC911] [Link To PC911] [Support PC911] [Legalese] ©Copyright 1998-2022 PC911 Webmaster |
||