| Friendly Expert Computer Help - In Plain English | |||

|
|
|
|
|
|
|
|
|
| PC911 > How-To > Hardware > Replacing A Power Supply |
How to replace it
Replacing the power supply can be relatively easy and safe if done correctly. First shut down your machine, unplug the power cord, and take the cover off the case. Disconnect all the power cords from the drives and the motherboard.
Click to enlarge |
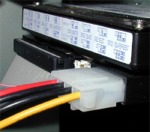
On the left you see a typical connector used for your hard drives and CD-ROM drives. This is often called a Molex connector. To remove them, simply pull them out. But don't pull at the wires, grab the white plastic part of the plug and wiggle it back and forth while you pull. These can be tough to remove sometimes. |
Click to enlarge |
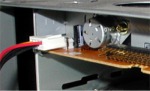
Here you see a typical connector for your floppy drive. It is commonly called a mini-plug. It also can be easily removed by simply grabbing the white plastic part and pulling it off. When you pull it off, make a mental note which way it was on for later. |
Click to enlarge |
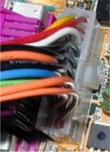
This is a typical ATX style motherboard power connector. You notice that on one side it has a little clip that secures it in the socket on the motherboard. Make sure you push this clip when removing it so you don't yank the entire socket off the motherboard. This article is only about replacing your power supply, not your motherboard ... Note: The older AT style connectors actually consist of two identical looking plugs 6-pin plugs, usually labeled P8 and P9. They plug in right next to each other. Make a mental note that the two black wires go next to each other in the center when you reconnect them. |
Click to enlarge |
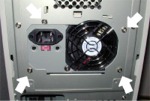
Now that you've disconnected all the cables from the power supply you can remove the power supply itself. Look at the back of the case. There are four screws around the power supply, on the outside of the cutout for the power supply. Remove the screws, but be sure to grab the power supply with one hand and hold it in place when removing the last screw so it doesn't drop into the case and damages any components. Carefully lift it out. |
That's it. You just successfully removed the bad power supply. Wasn't that hard, was it? And now that you're familiar with it and how it fits into the case, installing the new power supply will be even easier.
| Back To Top Of Page | ||
|
[PC911 Home]
[News]
[How-To's]
[Tips & Tweaks]
[Reviews]
[Freeware]
[Best Prices]
[Links] [Search] [About PC911] [Link To PC911] [Support PC911] [Legalese] ©Copyright 1998-2022 PC911 Webmaster |
||