| Friendly Expert Computer Help - In Plain English | |||

|
|
|
|
|
|
|
|
|
| PC911 > How-To > Hardware > Installing Memory |
- Alex -
Download this article as a text file (Self-Extracting Zip)
View this article in printer-friendly plain-text format
E-mail this article to a friend
Installing Memory
Adding more memory to your computer is not brain surgery. Even though it might sound intimidating to anybody who has yet to crack open the case of their PC, it is surprisingly easy. We'll show you in a few steps how to add RAM in just a few minutes.
Note: We'll cover only the most common type of memory modules for home computers in this guide, SIMMs and DIMMs.
Take It Off
Unplug everything from your PC and put the case on a clean work surface, preferably in a well-lit area. Remove the cover. If you suddenly find yourself attacked by killer dust bunnies, this might be a good opportunity to use a can of compressed air to clean out the dust and cob webs.
Safety First!
Before you get up to your elbows into the case, keep in mind that you're handling sensitive electronic circuitry that can be damaged if handled improperly. The biggest enemy is static electricity, so be sure to touch an unpainted grounded piece of metal before proceeding. The safest way to stay grounded is to leave the powerchord plugged into the back of your PC, leave the other end plugged into a power strip, plug the power strip into a wall outlet, and turn the powerstrip off. This way there is no power going to the PC, but the PC is grounded, and touching an unpainted part of the case will dissipate any static electricity.
Get any obstacles out of the way for unobstructed access to the motherboard. Depending on the type of case you have, you might have to temporarily remove a cable or two, or maybe even move a drive cage or power supply out of the way. A while back I was trying to install a memory upgrade in a extremely small proprietary PC. I had to remove the power supply, the CD-ROM drive, the hard drive, and the floppy drive just to get to the memory slot on the motherboard. Yikes! Hopefully your PC offers easy access. Make sure you remember what you unplugged or unscrewed from where so you can put it back when you're done.
Identifying The Memory Slots
First you need to figure out where to stick it. Look closely at your motherboard. Depending on what type of memory you have, you'll see one of the two following type of slots.
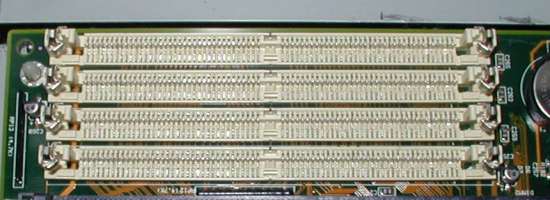 |
The first type is for the older 72-pin SIMM-type memory. It is usually found in first generation Pentium or older AMD CPU machines. This type of memory needs to be installed in identical pairs, no mix'n'match. The two slots that a pair of SIMMs go into is called a Bank. Most motherboards have two banks/four SIMM slots. The motherboard should show some type of marking, labeling the two banks as Bank 0 and Bank 1. This is important to know as you'll see later.
 |
The second type is by far the most popular 168-pin DIMM-type memory. It is found in all newer Pentium II/III, Celeron, Athlon, Duron systems. This type of memory can be installed one stick at a time, and can often be matched with different types of DIMMs. Most motherboards offer two, three, or four DIMM slots. The slots a DIMM goes into should be marked on the motherboard as DIMM 0, DIMM 1, etc. This is important to know as you'll see later.
| Back To Top Of Page | ||
|
[PC911 Home]
[News]
[How-To's]
[Tips & Tweaks]
[Reviews]
[Freeware]
[Best Prices]
[Links] [Search] [About PC911] [Link To PC911] [Support PC911] [Legalese] ©Copyright 1998-2022 PC911 Webmaster |
||