| Friendly Expert Computer Help - In Plain English | |||

|
|
|
|
|
|
|
|
|
| PC911 > How-To > Miscellaneous > Once More Into The Fire |
Now that we are masters of both data and audio CDs, let's put it all together and create an enhanced CD that has the best of both worlds. As I had mentioned before, there are three types of enhanced CDs. Mixed Mode (CD XA) puts the data first, then the audio. CD Plus is a multi-session CD that puts the audio first, then the data. And hidden track CDs put the data in track 1's pregap area. Now the question is, does it really matter which method we use? The answer is yes. The reason is for compatibility with older and even some of the more recent CD-ROMs. Old CD-ROMs will look at the last session for data. Most audio CD Players will expect to find audio on track 1, session 1. If it doesn't, it will assume that the disc is not audio. So the logical choice seems to be CD Plus.
To write CD Plus discs, we will go back to using CDRWin. Since the CD Plus format requires that a disc have two sessions, you first need to create a cue sheet for the audio data. Once the cue sheet is created, write it into the first session of the disc using the record function. Be sure to select the Open New Session option in the recording window before you start. Otherwise, you won't be able to add another session to the disc, which will prevent you from recording the data part of the disc.
Now let's move on to writing data discs. To write the data section of the disc do the following:
|
- Back out of the Recording dialogue box.
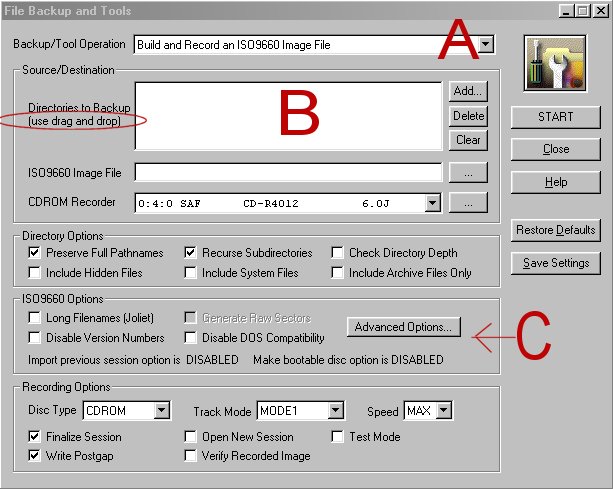
- Click on the 4th button in the first row. Its caption should be File Backup and Tools (Take a look at the screen capture)
- Within the tools dialogue box, choose the option Record Directories and files directly to an ISO9960 disc from the drop down menu in the section of the screen cap labeled A. Note that if you already have an ISO disc image, you can also choose the appropriate option to use that instead. If you know what an ISO9660 image file is, the options in the drop down should be fairly self-explanatory. If you don't, then just use what I mentioned above.
- The part of the screen cap labeled B is where all the files are listed. Notice that I circled the text (use drag and drop). I bring this to your attention because it is much easier to drag and drop your files from an explorer window than it is to add it through a dialogue box.
- If you'd like, you may also choose to change your file options in part C of the screen cap. The defaults should work fine.
- And finally, click on Start to begin recording.
Now, let's look at writing a CD XA disc, putting the data first, and then the audio. There are two major differences between CDXA and CD Plus. One of them is the placement of the data section of the disc, as I have mentioned. Another subtle difference is that while CD Plus is a multi-session disc, CD XA is not. CD XA discs can be written in one session. Simply place the data in track 1 and all other audio tracks following it. The simplest way to do this is to create a cuesheet. An example cue sheet is provided below:
FILE C:\MYDATA.ISO BINARY
TRACK 01 MODE1/2048
INDEX 01 00:00:00
POSTGAP 00:02:00
FILE C:\MYAUDIO.WAV WAVE
TRACK 02 AUDIO
PREGAP 00:02:00
INDEX 01 00:00:00
TRACK 03 AUDIO
INDEX 01 05:50:65
TRACK 04 AUDIO
INDEX 01 09:47:50
Since I have already extensively covered writing cue sheets, I won't go into detail here, except to say that when you are combining data and audio tracks, there is a mandatory 2-second post gap after the data track. Other than that, everything else should be pretty clear.
Now that we've done integrating both data and audio, why not go one step further? Let's put together data and video. When you integrate both data and video onto a CD, you are creating a CD-I disc. CD-I is a bigger umbrella term for a CD that stores special multimedia files and such. There are some substandards defined under the CD-I term for VCDs, Karaoke CDs, etc. The Video CD Standard (defined by White Book) allow for more data to fit into a CD than is possible if the data were stored on a Data CD. It also allows for interactive selection of content. The reason is that in a Video CD, certain bit errors are tolerable in that they will not degrade the quality of the movie noticeably. Thus, some of the error correction mechanism implemented in the data CD standard is removed. That extra space is thus available to store more movie stuff. In the end, a video CD can store 13% more than a standard data CD.
A Video CD is composed of several Mode 2 CD XA tracks. The first track on the CD is actually a standard Mode 1 track. This is necessary to store the ISO information so that the CD is viewable on the computer. The tracks after track 1 store the actual movie files and such. Those are Mode 2 tracks with 2324 bytes per block, as opposed to the 2048 bytes for normal mode 1 tracks (hence 2324/2048 yields 1.13, or 13% gain).
A VCD comes with several standard directories:
- VCD: information about the available tracks and how they shall be played
- EXT: contains info that tells a CDI player how to play the disc.
- CDI: this directory contains the Philips CDI application and it's support files.
- MPEGAV: this is where all the movie files are stored.

|
- First create the MPEG you need, or download it from you know where.
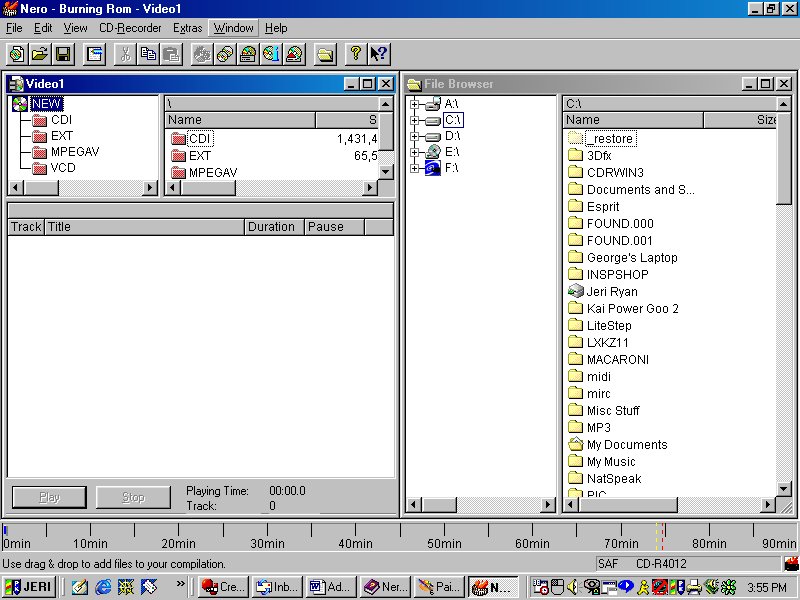
- Click on File - New from Nero
- In the New File dialogue box, choose Video CD from the left hand side.
- You can leave all the settings the way they are.
- Click on New
- At this point, you should see two windows. On the left hand side is your Video CD compilation windows. The top portion refers to the ISO section of the disc, the part that stores the normal computer files. The bottom portion displays the number of MPEG tracks available. On the right hand side, you should see a file browser window from which you can drag and drop the files you want to record. Note that if you drag an MPEG file into the upper portion of the Video CD window, it will not be recorded as a video track. You must drag and drop it into the lower portion.
- Once you are done, click on the Record button (the icon on the toolbar with two CDs on it).
- Viola, you are done.
|
| Back To Top Of Page | ||
|
[PC911 Home]
[News]
[How-To's]
[Tips & Tweaks]
[Reviews]
[Freeware]
[Best Prices]
[Links] [Search] [About PC911] [Link To PC911] [Support PC911] [Legalese] ©Copyright 1998-2022 PC911 Webmaster |
||